Who can write an SOP?
While subject matter experts often write SOPs for their own processes, the author of an SOP does not necessarily have to perform the job or process. They should have some knowledge of the subject but do not need to be a subject-matter expert (SME) on the topic. A technical writer can interview personnel and observe activities to capture the steps. Sometimes, it is better to have someone independent of the process help map the process, interview, ask detailed questions, and distill the information into a written procedure.
Typical Procedure Format
SOPs are typically broken down into sections or “Subheadings”. Descriptions of typical sections are as follows:
- Purpose: Explains what the procedure provides and why it is provided. This section usually starts with “This procedure defines the requirements for…” or “This procedure establishes…”.
- Scope: Defines what the procedure applies to. It is also helpful to include any specific exclusion here. This should NOT be a restatement of the purpose. For example: “This procedure applies to the control of equipment used in medical device manufacturing operations at the [location] site of [Manufacturer]”.
- References: List of standards or specific regulations that the procedures support and any subordinate or related documents that are directly referenced in the procedural content.
- Definitions and Abbreviations: List in alphabetical order. Preference must be given to citing definitions provided by regulation or international standards above any other sources. Any necessary clarifications regarding the manufacturer’s interpretation and use of the terms can also be added.
- Responsibilities: List by functional department or position description (e.g., Regulatory Affairs, Product Development Engineer, Quality Assurance Technician, etc.). Specific titles (e.g., “Manager of XXX” or “Director of YYY”) should only be used if there are very specific responsibilities that can only be done by someone with a particular title or level of authority. Never use personal names.
- General Requirements: State high-level assumptions, relevant policies, or requirements.
- Procedure: Step-by-step information and instructions to explain how to fulfill the requirements and meet the purpose of the procedure. This section should “walk” the reader through the process/task in a logical sequence. A process workflow or flow chart should be developed and inserted into the procedure either upfront or as an Appendix. The procedure should follow the logic in the flow chart and provide detail for each step. Subheadings within this section provide the reader with discrete sections that help compartmentalize information and facilitate readability.
- Record Keeping: If the procedure requires the maintenance of records, the record-keeping section specifies how those records, including the source document, are to be maintained (where, who, and how long). Record retention requirements should be considered, and the record retention SOP or policy document should be referenced.
- Appendices: Any attached appendices should be listed in the Appendices section. If there is more than one, identify them as Appendix A, Appendix B, etc. Each appendix should have a title for reference.
Procedure Content
Procedures need to have the right level of detail. A well-written procedure means that two individuals with similar skills should be able to read and execute the procedure and achieve the same output or result. It is better to have more detail than not enough. A procedure should be written in sequential steps that follow the process being defined. A process map (flow chart) should be generated for any procedure that is intended to explain how to do any specific task or activity. Consider using an Appendix for any complex charts, tables, diagrams, or supplemental information if it is complex and requires more than half a page. Consider referencing a separate work instruction for highly detailed instructional information such as how to navigate through a software program or how to set up a complex piece of manufacturing equipment. Answers to potential reader questions should be built into the content. It is helpful to “walk through” the process with someone unfamiliar with it to test the content and how it is interpreted. Examples should be provided where possible, as they can improve comprehension. They should be relevant and appropriate to the audience. Examples can be situational narratives or visual aids to help explain a concept.
General Writing Style
Procedures are typically written in the third person with no gender-specific references. Write in an active voice, especially when providing step-by-step instructions for executing a specific task. Avoid using superfluous and unnecessary wording, opinion, and ambiguity. Be careful of the use of “jargon” or “technical slang” without an initial explanation. While it is common and, to a certain degree, acceptable to use industry-specific jargon when writing technical procedures, it is important to explain terminology that may be specific to your organization on first use in a procedure.
Avoid using the terms “should” and “may,” as they imply that a stated task is optional or not required. “May” is appropriate when stating possible consequences, choices, or options that are not related to instructions. “Should” can be appropriate if the instruction is not mandatory or if choices are applicable, but guidance is necessary to clarify when the instruction applies. Instead, use “shall”, “must”, or “will”. These terms mean the task or instruction is mandatory and/or expected and do not imply options or alternative methods.
When listing examples or clarifying/emphasizing content, “e.g.,” is used to provide an example, while “i.e.,” is used to restate the same content for clarity or emphasis.
Formatting Procedures for Effective Delivery of Information
The format is important as it helps readers find information, facilitates readability, and can assist in effectively conveying complex thoughts or concepts. Procedures should follow the same format; however, this format may be intermittently modified to help improve readability and comprehension (e.g., adding a pertinent heading; or changing the page layout to landscape to accommodate large matrices or tables).
Headings and subheadings should be bolded for section titles to help a reader more easily find specific content. Numbering paragraphs or discrete sentences within a procedure provides a means of referencing specific parts of a document and helps a reader systematically follow a set of instructions. Nested numbers (legal document numbering) are typical but can make the document more difficult to read if the nesting goes to four and five levels. This may indicate a need to reorganize information or even develop a work instruction to deliver very detailed information. Numbers should be formatted so that they are indented to align with the words of the paragraph above (hanging indent) and should not be “left justified” with the more general section preceding. This “anchors” the information to the section above and visually helps the reader to understand that the content is part of the section above but is subordinate to it.
For example:
- Subheading A
- Information, action, or instruction.
- Additional Information action or instruction
- Subtopic to Subheading A
- Details regarding the subtopic to subheading A.
- Further details regarding the subtopic to subheading A.
When providing a list that is not considered part of a set of sequential instructions, use bullet points instead of numbering. Bullet points make it clear to the reader that they are reviewing a list and help to break up the monotony of nested numbering. Indent bullet points so they align with the left margin of the text immediately above, just as you would with nested numbering.
- Subheading B
- Additional information that includes a “list.” For example:
- Item
- Item
- Item
- Item
- Additional information that includes a “list.” For example:
MS Word default settings may not always provide the appropriate or best formatting options, and paragraph/number formatting may need to be adjusted manually. Do not indent by tapping the space bar of the keyboard multiple times. Instead, use the ruler in MS Word and/or the indent keys on the menu bar. The format painter on the menu bar is a helpful tool to copy formatting from one section to another.
Tables and matrices are often helpful to organize information and assist in ease of comprehension. Tables and matrices can be a good way to break up long narratives and provide excellent tools for training. Table headings and discrete numbers or specifications should be centered, while longer narrative content should be left justified. Caption numbers should be applied to tables (e.g., Table 1, Table 2) if they are intended for reference or to “look up” information. Do not apply caption numbers if the table is part of the instructional information that is in a numbered section.
Graphics and illustrations can help facilitate readability and convey complex content or concepts. These can include diagrams, pictures, flow charts, or other graphic content. When providing instructions for anything detailed, try to include helpful pictures or diagrams. Photographs need to be clear, without distracting or superfluous information. Include helpful callouts, annotations, or captions. Apply figure numbers to inserted graphics, pictures, diagrams, or flow charts. This can be done by selecting the inserted object and then inserting a caption.
“Notes” can be used to provide clarification or additional guidance. A note should be bold and offset from the narrative to call a reader’s attention to a point, as shown here:
Note: A note provides a means for calling special attention to a specific point that clarifies the preceding content.
It’s helpful to reference other documents, rather than duplicating the same information in multiple procedures. Duplication of information can result in inconsistencies over time as changes are made in one procedure, but inadvertently not made in the others. However, some degree of duplication may be necessary to avoid sending readers to multiple other procedures to execute a task. Use good judgment and discretion when deciding whether it is best to refer to information that exists in another procedure or re-state the same or similar content. When referencing a procedure or form for the first time, the full document number and title should be used; subsequent references can be the document number only. Do not include the revision/version number or reference a specific section, as these can change if the referenced document is revised. Bold font should be used for Company Documents and Form references. Avoid pointing the reader to a document that then references another subordinate document to provide the information. Instruct the reader to go to the specific document that contains the information necessary.
Appendices and attachments are useful to include in procedures. Appendices are typically attached to a document and provide supplemental information to the main document. The term “attachment” is sometimes used synonymously with “appendix”; however, for procedures, the term “appendix” is preferred.
Forms
Forms can be designed with smaller fonts than are used in written procedures. This can help with formatting, design for usability, or providing instructions to the user. Consider what information is to be recorded or captured and structure design for ease of use and review. Where possible, structure forms with easy-to-use drop-down menus and checkboxes using the “Developer” mode in MS Word. Always leave checkboxes with the boxes “unchecked” as a default and ensure the first term/option in a drop-down list is “Select xxx” or “Select from List”.
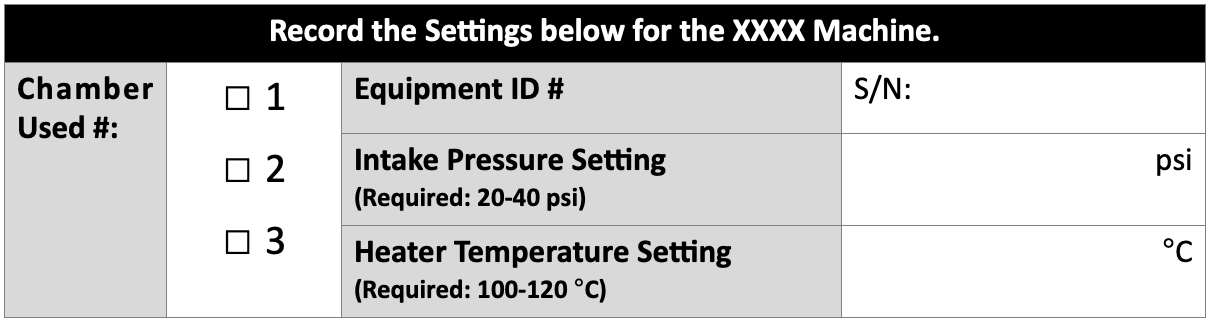
Tables are often helpful when using forms because they provide clear places to record specific information. Make sure it will be clear what information is embedded in the FORM itself versus information being recorded by the user. This can be done by shading boxes a light color and using BOLD text for embedded information and leaving boxes where users record information without special formatting. It is helpful to embed the correct unit of measure for the user if forms will be used to record specific technical data, measurements, values, or other specifications. For example:
Forms should be succinct in design. Keep them to the minimum number of pages possible. When designing a form, it is often helpful to set very wide margins to use all the “space” on the page for the collection of information. Make sure to allow for form boxes to be expandable as the user types information. Try to avoid forcing the user to attach extra pages, except where this is absolutely necessary. Check font size, color, etc., for the information to be recorded in tables or boxes to ensure it is correct before routing for approval (i.e., test the form before sending it for approval.) Ensure completed content will look appropriate.